Here is a way to print graphics to an EPOS receipt printer using APA(All Points Addressable) format. When printing to one of these little receipt printers, you could always use a windows driver which lets windows see it as standard GDI printer and therefore send graphics as a bitmap to the printer from any windows program. This works but its extremely slow. A 24dpi printer will take a long time to print a big bitmap image.
The ultimate way to send a bitmap to the printer is by using ESC/P commands and building vertical segment slices in code and sending these to the printer. It’s extremely fast. There is some work involved in understanding how this is done. The coding is not that complicated, however, if you don’t have a grasp of how these dot matrix printers handle bitmap image slices, you will have a tough time. So lets get started by showing you how these printers deal with graphics slices.
I was working on a project which uses either a “Ithaca Series 90 plus” or a “Cognitive TPG-A760” receipt printer to print a signature at the bottom of the receipts. I opened both programming books and found generally the same graphics format.
Ithaca APA graphics command format:
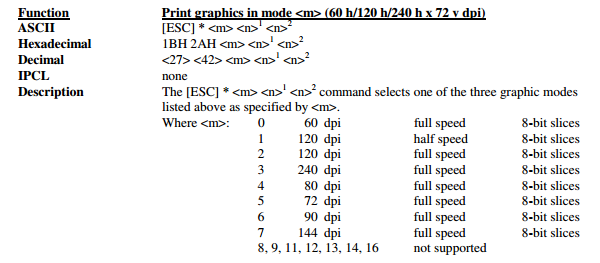
Cognitive TPG APA graphics command format:

Well sure, that makes perfect sense. It looks like I send [1B + 2A] to activate graphics mode then send [33] to select 24-dot double density then [n1 n2??????]. What? Nowhere is this explained very well. The bit layout at the bottom does a great job of explaining the layout of each slice, but what about n1..n2? I assume that d1..d2 is the data. so n1..n2 must be size of the data in some way. It is quite confusing and terribly written but if you study the formula given for 8 dot mode, it starts to make, well, no sense at all.
As it turns out, the best explanation I have ever read that explains this so well, which is also the inspiration for creating this Delphi Snippet, is Nicholas Piasecki’s blog. (<- Nicholas took his site down so the link is dead)
And here is the snippet:
function BitmapToAPAGraphics(const bmp:TBitmap;
                                      const RowHeightEscapeStr:String;
                                      const SliceEscapeStr:String;
                                      const BitsPerSlice:byte = 8):String;
const threshhold = 127;
      CR = #13;
      LF = #10;
TYPE
    TBitArray = array of boolean;

    TRGBTripleArray = ARRAY[Word] of TRGBTriple;
    pRGBTripleArray = ^TRGBTripleArray; // Use a PByteArray for pf8bit color.
var
    iCol,iRow,index, sliceIndex, bytePos, bitPos, offset,luminance: integer;
    line: pRGBTripleArray;
    Pixel: TRGBTriple;
    tmpFile: TextFile;

    dots: TBitArray;
    slice,bit,tmpBit,bytesPerSlice, hold: byte;
    bVal: Boolean;

    p:pRGBTripleArray;
begin
  result := '';

  if not Assigned(bmp) then exit;
  if SliceEscapeStr = '' then exit;

  try
    bmp.PixelFormat := pf24bit;

    SetLength(dots, (bmp.Height * bmp.Width));

    index := 0;

    //1) Loop the bitmap scanlines and build a bitArray from each pixel
    for iRow := 0 to bmp.Height-1 do
      begin
        line := bmp.Scanline[iRow];

        for iCol := 0 to bmp.Width-1 do
          begin
            Pixel := line[iCol];
            luminance := Trunc((Pixel.rgbtRed * 0.3) + (Pixel.rgbtGreen * 0.59) + (Pixel.rgbtBlue * 0.11));
            dots[index] := (luminance < threshhold);
            inc(index);
          end;

      end;

    offset := 0;

    //Convert BitsPerSlice to byte count in each slice
    bytesPerSlice := (BitsPerSlice div 8);

    //if there is a remainder, we need another byte added (9 bits is 2 bytes, etc...)
    if BitsPerSlice mod 8 > 0 then
      inc(bytesPerSlice);

    result := result + RowHeightEscapeStr;

    //Loop height steping down by offset
    while offset < bmp.Height do
      begin

        result := result + SliceEscapeStr;

        //Loop width of bitmap
        for iCol := 0 to bmp.Width-1 do
          begin

            //Loop each byte from current slice
            for sliceIndex := 0 to bytesPerSlice -1 do
              begin
                slice := 0;

                //Loop each bit from current byte from current slice
                for bit := 0 to 7 do
                  begin
                    bytePos := (((offset div 8) + sliceIndex) * 8) + bit;
                    bitPos := (bytePos * bmp.Width) + iCol;

                    bVal := FALSE;
                    if bitPos < Length(dots) then
                      bVal := dots[bitPos];

                    //Delphi has no ternary operator so we have to compensate
                    if (bVal) then
                      tmpBit := 1
                    else
                      tmpBit := 0;

                    slice := slice or (tmpBit shl (7 - bit));

                  end;

                result := result + chr(slice);
              end;
          end;

        //Step down to next slice
        inc(offset,BitsPerSlice);

        result := result + CR+LF;

      end;

  finally
     dots := nil;
  end;

end;
Example:
function PrintBitmap(bitmapFileName:String):Boolean;
var RowHeightEscapeStr,SliceEscapeStr, prnBuffer:String;
    myBmp:TBitmap;
    nL, nH: Byte;
begin
  if FileExists(bitmapFileName) then
    begin
      myBMP := TBitmap.create;
      try
         myBMP.LoadFromFile(bitmapFileName);
         RowHeightEscapeStr := #27+#49;

         nH := Hi(myBMP.Width);
         nL := Lo(myBMP.Width);

         SliceEscapeStr := #27+#42+#50 + chr(nL)+ chr(nH);

         prnBuffer := prnBuffer + #13+  BitmapToAPAGraphics(myBMP,RowHeightEscapeStr,SliceEscapeStr,8);

      finally
        myBMP.Free;
      end;
   end;
 end;
This can also be done using the “GS v 0” ESC/POS command which is simpler to use and the image quality looks a little better.
Hi Les,
Thanks for the connection on LinkedIn by the way!
I have never used that specific command myself. I don’t even remember seeing that one in the programming manual as being supported by the TPGA760 that we were using at the time. I will definitely check it out and thanks for the tip. You are the hardware expert(per your credentials on LinkedIn). I will check this in the manual in the morning and report back.
Thanks again.
Hiii… Can you Share For Full Project..?
Hi,
Do you mean you would like to get a full working Delphi project using this EPOS code?
Thanks!
yes, I tried to make a Delphi project with sample code, but it still does not work perfectly. algorithm seems a little different from the http://nicholas.piasecki.name/blog/2009/12/sending-a-bit-image-to-an-epson-tm-t88iii-receipt-printer-using-c-and-escpos/
I have tried this code in D2007 and XE6 (change the Strings to AnsiString) but I only get all kind of weird characters.
Did you ever get it to work?
Kim
Hi Kim,
Unfortunately, shortly after writing this post, I moved on to another company and I no longer have access to the POS printers from my previous employer. The code as written worked perfectly on the printers mentioned in the post and is still in use by that company today. If your printer is a 9-pin and supports ESC/P commands, it should work. I should have mwentioned in the post that it was written in Delphi 2010.
Very good explanation here:
http://new-grumpy-mentat.blogspot.co.za/2014/06/java-escpos-image-printing.html
It is a JAVA example, but it is very well explained and easy to follow.
I would like to know if I would have this same example, working for delphi firemonkey?
Hi Ricardo,
I haven’t updated the code in a while. I will try and get my hands on another printer for some update testing.
Thanks
Hi Chris,
Thanks for this article, it was really helpful when I put together my “thermal printer photo both” project: https://trandi.wordpress.com/2017/11/29/receipts-printer-photo-booth/
I’m using Haskell to control the printer, but nonetheless, your post and others helped me make sense of the POS documentation… 🙂
Thanks,
Dan
Hi Chris,
I know it’s old, but this article was still one of the ones that helped me the most in coming up with a Haskell version of this code for my Raspberry Pi “photo booth” project : https://trandi.wordpress.com/2017/11/29/receipts-printer-photo-booth/
So thanks !
Dan
Thanks Dan. I went to your link. Very clever and interesting stuff. Glad my post helped you out.